Finger jointing connections
You see the entry in
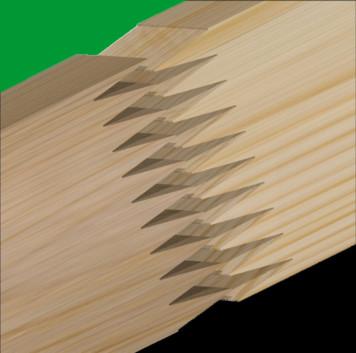
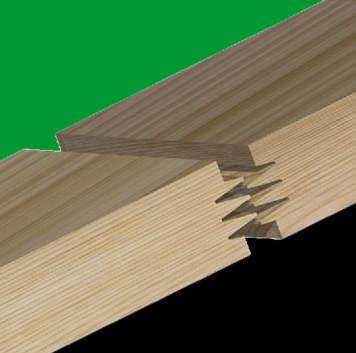
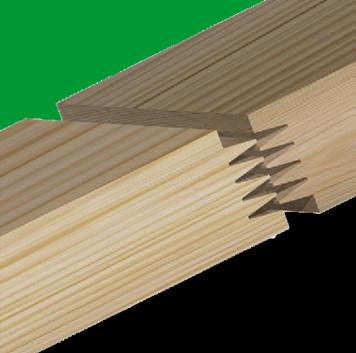
       Basically, finger jointing connections are longitudinal joints of solid timber, the ends of which are glued together using interlocking profiles of wedge-shaped tines of the same width and length. The term finger joint is defined in DIN standard 68140-1 and specified in other DIN/EN standards depending on the area of application. However, this standard is only binding for load-bearing joints, so some of the finger joints used in furniture construction do not comply with European and national standards. Use of finger jointsFinger joints can be used wherever short, elongated workpieces made of solid wood (e.g. mouldings, planks, squared timber, boards) need to be extended. This can be the case when good pieces from wood optimisation that have been cross-cut using optimisation cross-cut saw are to be reassembled into uniform workpieces. Finger joints also play an important role in timber engineering, as it would be almost impossible to realise large timber structures without workpiece extensions. The need for a finger joint results from the fact that it is not possible to glue solid wood permanently on the face side due to the wood structure. By milling interlocking profiles, the contact surfaces between the workpieces are exclusively longitudinal wood and can therefore be glued together without any problems. The finger-jointing of construction timber is subject to special regulations in Germany and the EU. Only specially certified companies are permitted to produce finger-jointed goods for use as construction timber (e.g. glues laminated wood, solid structural timber) (so-called "glue authorisation"). Forms of finger-jointed jointsIf the workpieces to be joined do not have a square cross-section, a basic distinguishing feature is the direction in which the prongs are joined. Vertical jointThe term "vertical jointing" can be used to refer both to the alignment of the tines on flat boards and to the position of the workpieces when milling tines with package systems. The boards are stacked on edge and are therefore vertical. The tine profile is visible across the entire width of the workpiece. Advantages:
Disadvantage:
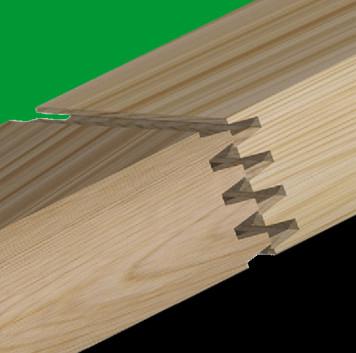
Applications:Primarily for construction timber or particularly inexpensive finger-jointed goods, as a centre layer for window scantlingsHorizontal finger jointThe tine profile is only visible on the narrow side of the workpiece (the tines are therefore aligned horizontally when the boards are lying flat), when the profile is milled with package systems, the boards lie flat or horizontally next to each other. In order to prevent half-cut tine profiles and chipped areas on the surface, horizontal tines are usually designed as "shoulder tines". Milling tools adapted to the thickness of the workpiece are used. These only mill the tine profile up to a few mm below the workpiece surface. Smooth glue joints are created at the top and bottom (usually with synchronised scoring saws). Advantages:
Disadvantages:
Application:Primarily for furniture panels and other workpieces in the visible area Standards for finger joints:
Image sources: Weinig/GreCon (Figure 1), Dirk Bartens |
Images